TOTAL PAGEVIEWS

Search This Blog

Translate

Sunday 28 June 2020

How To Make Super Soft Sponge Cake | Butter Sponge Cake Recipe | 像棉花般柔软的蛋糕---棉花蛋糕 | 燙麵法


Wow and impress everyone with your baking? Here is my secret recipe how to make cotton sponge cake was published by September 2015. By far the tastiest homemade butter cotton cake ever!  This is new, an improved version and recipe I had tried previously many times until satisfied, the taste of smell is closely related to traditional baked egg cake and now like Taiwanese castella cake. It's a teatime treat!

Ingredients

Makes 1 (PME round cake pan 6-inch)

(A)
• 35g salted butter, melted
• 35g whole or semi skimmed milk
• 10g golden granulated sugar
• 2 large egg yolks, cold
• a pinch of sea salt
• 1/2 tsp vanilla extract
• 35g cake flour or 23g plain flour + 12g corn flour

(B)
• 2 large egg whites, cold
• 1/4 tsp cream of tartar or 1/2 tsp lime / lemon juice / distilled vinegar
• 35g golden granulated sugar

(C)
• 1 tsp dark cocoa powder
• 3 tsp hot water

Method:

1) In a saucepan, add salted butter, milk, sugar, and bring to a simmer until the sugar dissolves. Turn off the heat. whisk the egg yolks to break them up one by one. Add the sieved cake flour, use a spatula press on it, and then use a strainer for an extra smooth.

2) In a separate bowl, start beating the whites at low speed until they are foamy, then add a tsp of cream of tartar or squeezing a little lime or lemon juice and add sugar a little bit at a time, move on to medium or even medium-high speed, do not beat on high, until nearly stiff peaks, about 3-5 minutes. Turn the whisker upside down and those peaks can hold proudly.

3) Fold about 1/4 of the egg whites into the yolk mixture, then repeat until the batter is evenly combined. Pour the batter into 6-inch pan and shake to release any large air bubbles.

4) In a small bowl, mix the cocoa powder and hot water together until smooth. allow to cool and then add a little cake mixture, mixing well until evenly blended.

5) Place the bag inside a tall cup, spoon your chocolate batter inside the bag, snip off the corner. gently squeeze and use a toothpick or whatever tools can create any pattern you wanted on the top of cakes before you bake it to get a lovely effect.

6) Use a large baking pan for a hot water bath, steam bake in preheated oven to 100ºC, always use (oven thermometer) and bake with both top and bottom heat without fan assisted and bake for 65 minutes, and increase to 130-150ºC for another 10 minutes.

Reminder: To make sure your cake to succeed even better. It is best to use an oven thermometer and you'll always have the exact temperature of your oven in mind.

7) After it s baked, let it stand in the oven for 15 minutes, until the oven temperature reached 50ºC, which can avoid your cake to collapse. Dropping the cake pan from high to prevent the cake to shrink too much during cooling. Place treats on tray! It is best served chilled. 

Helpful Tips:
1) Store in covered containers in the fridge and consumed within 2 days.
2) Do not bake the cake quickly at a high temperature and don't remove hot cake out of a baking pan. otherwise the cake could fall apart and crack on top. Baking cake at a lower temperature will help the cake rise much higher and bake more evenly. 
3) Please understand that everyone's oven work differently. You should also check the temperature of your oven. if not, your cake won't rise well. 
4) You can test the cake by poking it with a skewer, if it's cooked the skewer will come out clean. if not pop it back in the oven and bake until it's ready. 
5) Folding egg whites into a cake batter. Do not stir and never use an electric mixer. 
6) Do not over or under-beat the egg whites. Use a clean, dry bowl, free of yolk and any other oil or grease while beating egg whites. 
7) Beating egg whites is a very important process, It will help your cakes rise with perfectly.
8) Cover with foil after a few minutes if the cake of top starts to get brown and continue rising nicely with a golden top.
9) For guaranteed results it's important to follow exactly this recipe and baking at the right temperature also recommended to use an oven thermometer.

Recipe Source: Josephine's Recipes 

Tuesday 16 June 2020

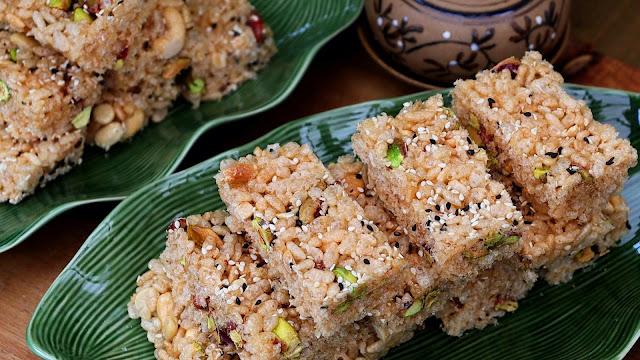
怎么做好吃的古早味零食,又香又脆的米花糖,米通的做法!


记得小时候,在农历新年期间,小吃摊,到处都可以买到的这种香脆可口的零食。相比传统,该食谱和方法完全不同,都是自己用时间来摸索制作,认为最满意的。其实美食就是随心所欲的灵感,口味能留下记忆,吃到嘴里香香脆脆的,也能让人得到满足,所以我们做美食还是要照顾好自己的口味,更要敢于创新。食谱中食材,用量、口味、功效也是经过长期次的验证。 没有经验的也可以掌握了诀窍轻松做出。希望能让大家学会可以摆摊了。

制成8个大/ 10个中/ 16个小块


材料:
1/4茶匙有盐黄油
35克,21/2汤匙金砂糖
65克,21/2汤匙纯蜂蜜或麦芽糖
100克盐烤开心果,腰果,榛子和核桃,可依自己喜好
100克家乐氏卜卜米
熟黑白芝麻,适量

方法:

1)将黄油放在锅中中火融化。
2)加入砂糖和蜂蜜,搅拌直至融化并起泡,然后加入所有的坚果和加入卜卜米,翻拌均匀。
3)撒上芝麻,倒入烤盘,用塑料刀按平。再撒上芝麻。也可以盖一层烘焙纸后,用手压实。冷却定型后就可以切片享用。

分享食譜請寫 👉來源食譜:約瑟芬的食譜

版权声明:凡本网原创作品,不得转载。
禁止声明授权使用或二次编辑和重新加载此视频。
分享原版视频请注明【食谱原作者:约瑟芬食谱】


Saturday 13 June 2020

Easy And Tasty Puffed Rice Candy Recipe - Rice Krispies Treats


I remembered when I was a child, this kind of crunchy and sweet snacks for sale anywhere during Chinese new years in street food stall. This recipe and method are totally difference compare with the traditional ones. It's much more easy and very tasty to make them at home, I've failed and tested also experiment many times to get it right and satisfaction. Fortunately, I don't give up and results in my own original recipe was published 5 years ago (May 4, 2015). Since my husband and myself secretly eats a lot of snacks, junk food and purchased in local and imported groceries store. Mostly we skipped and almost turned homemade snacks is our home's all-time favourite. There are no preservatives, no additives, no artificial ingredients, no palm oil and you know what you added on it. A good recipe are important because it helping you control costs, zero waste, it is great to make ahead, also contain the information the amount of ingredients and method. I wanted to make sure yours turn out perfectly treats and enjoy!

Makes 8 Large/10 Medium/16 Small pieces

Ingredients:

(A)
1/4 tsp butter, salted
2
1/2 tbsp, 35g golden granulated sugar
2
1/2 tbsp, 65g pure honey or maltose syrup
100g mixed nuts, roasted pistachio, cashew nuts, hazelnuts and walnuts or use whichever best suits your own preferences
100g rice krispies, kellogg's
a handful of sprinkles of white and black sesame seeds.

Method:

Line a 30x20cm baking tray with baking paper and set aside.

1) Place butter in the bottom of a large saucepan on medium heat. Stir occasionally until butter is completely melted.

2) Add granulated sugar and honey or maltose syrup, stir until melted and bubbles up, then add all the mixed nuts and rice krispies, quickly stir until they are thoroughly combined.

3) Immediately transfer mixture to prepared pan and sprinkle over sesame seeds and use a silicone spatula, dough scraper or your hands to pat rice krispies treats down evenly into pan. allow to cool completely at at room temperature before cutting and serving. It can certainly be enjoyed for up to 3 days if stored properly.

Helpful Tips:

1) If you want your rice krispies treats extra chunchy, or you can't handle to shape it and mess around, you can bake them in the preheated oven 100ºC, top and bottom heat with fan for 5-8 minutes, 
2) To clean the saucepan afterwards, simply fill with tap water, place over medium high heat and allow the water to come to a boil, the sugar crystallised will melt completely.

Recipe Source: Josephine's Recipes 


Tuesday 9 June 2020

绝不开裂的,舒芙蕾口感的~日式轻乳酪蛋糕


绝不开裂的,舒芙蕾口感的~日式轻乳酪蛋糕,入口即化,甜而不腻,下叉子的时候噗咻~一声,送进嘴里是云朵一样轻盈梦幻的口感。还不快点儿尝试一下?

(材料A)
180克奶油奶酪
20克有盐黄油
20克糖 (金砂糖比白砂糖好)
3蛋黄
50克牛奶
38克低筋面粉
或 (25克中筋面粉+ 13克玉米粉)

(材料B)
3蛋白
1/4茶匙塔塔粉/ 柠檬汁/醋
40克糖 (金砂糖比白砂糖好)

做法:
1)在碗中,加入奶油奶酪和黄油,提前在室温下,烤箱下方放一碗热水,或烤箱预热到最最低设置,放置几分钟烤箱软化。 个人认为提前在室温下软化比较简单些。 继续搅拌直到所有的小块都融化了。然后加入糖,逐个蛋黄加入面糊,并搅拌均匀。 倒入牛奶并筛低筋面粉,搅拌直至均匀混合,使用滤网使面糊更加光滑,并确保没有结块。

2)在另一个碗中,用手动搅拌器将蛋白以低速至中速打至起泡,然后加入塔塔粉或柠檬汁,然后分次加一点糖,继续以中速搅拌至山峰形成,约3-5分钟。

3)将约1/4的蛋白霜拌入蛋黄糊中,然后重复翻拌手法将面糊均匀混合。倒入6寸模1个。底模和边缘,抹上一层薄牛油,垫上纸,倒入面糊,8分满,轻磕几下,摇晃以释放大气泡。

4)热水浴,预热烤箱100°C,上下火烤,65分钟。130C/150C 再烘烤10分钟。

5)在烤箱中放置至少15分钟。直到烤箱温度达到50ºC。

6)脱模,放冰箱冷藏一天再吃,有入口即化的感觉。

有用的提示:

1)加入少量塔塔粉/ 柠檬汁/醋能够增加蛋白的稳定性,防止蛋白霜消泡。 
2)不要一次性加入所有蛋白霜,这样不容易混合均匀,也容易让蛋白消泡。
3)蛋白的打发不要太硬,有拉出软软的弯勾就行,不然很容易开裂。
4) 蛋黄糊搅拌的整个过程都不要太久的时间,搅拌多了,面粉的面筋太强,会影响烘烤后蛋糕面的回缩。
5) 奶油奶酪奶冷冻后就成渣了,做乳酪蛋糕时会有很多小颗粒,影响蛋糕的品质,奶油奶酪只能放冷藏。
6)烤好后不要急于取出来,在烤箱中放置至少15分钟。直到烤箱温度达到50ºC。由于温度骤降,回缩是因为温差迅速变化影响的,所以放在烤箱里慢慢回温。建议使用烤箱温度计,是为了确保烤箱温度正确。
7) 温度不要太高,蛋糕成长太快,这会造成烤好的蛋糕开裂和凹底。

版权声明:凡本网原创作品不得转载。
禁止声明授权使用或二次编辑和重新加载此视频。
分享原版视频请注明【食谱原作者:约瑟芬食谱】


Friday 5 June 2020

Jiggly Fluffy Japanese Souffle Cheesecake - Josephine's Recipes


Why not try this jiggly and fluffy Japanese souffle cheese cake, make it for lunch, afternoon tea or a birthday cake to surprise your loved ones. Once you make yours, the smell that fresh baking smell in the kitchen, and the taste of heavenly you won't go back to buying shop bought cakes! It is definitely one of the best Japanese cheesecake, its jiggly, fluffy, moist, and wonderfully melt in your mouth.

Ingredients

(A)

180g cream cheese. Philadelphia or any your favourite brand
20g butter, salted
20g granulated sugar, golden
3 egg yolks
50g milk
cake flour 38g
or (25g, plain flour + 13g corn flour)

(B)

3 egg whites
1/4 tsp cream of tartar / lemon, lime juice, white vinegar instead
40g granulated sugar, golden

You will need 6-inch square cake pan. Line with the prepared round of parchment paper in the bottom and the sides and grease with butter.

Method:


1) In a bowl, add the cream cheese and butter, allow to leave at room temperature or in warm oven for a few minutes. whisk together until melted and smooth and then adding sugar, and whisk the egg yolks one by one. pour milk and sieved the cake flour, stirring until evenly combined, use a strainer for extra smooth batter, and make sure there are no lumps.

2) In another bowl, beating egg whites with a hand mixer, on low to medium speed until foamy, add cream of tartar or lemon, lime juice instead and add sugar a little bit at a time, continue to beat on medium speed until nearly stiff peaks form about 3-5 minutes. 

3) Fold about 1/4 of the egg whites into the yolk mixture, then repeat until the batter is evenly combined. Pour the batter into 6-inch pan and shake to release any large air bubbles.

4) Use a large baking pan for a hot water bath and bake in preheated oven to 100ºC, always use (oven thermometer) and bake with both top and bottom heat without fan assisted and bake for 65 minutes, and increase to 130-150ºC for another 10 minutes.

To make sure your cake to succeed even better. It is best to use an oven thermometer and you'll always have the exact temperature of your oven in mind.

5) After it s baked, let it stand in the oven for 15 minutes, until the oven temperature reached 50ºC, which can avoid your cake to collapse. Dropping the cake pan from high to prevent the cake to shrink too much during cooling. Using a stencil, lightly sift with powdered sugar, gently remove stencil. Place treats on tray! It is best served chilled. 

Helpful Tips:
1) Can you freeze the cream cheese? Not recommended. The texture will change considerably. It will be more crumbly and less creamy once thawed. it won't be as creamy as it used to be. When frozen, the cream cheese's liquids and solids will separate and this will alter the texture of the cream cheese. Still, frozen and thawed cream cheese is safe to use in cooking and baking.
2) I recommend one thing, do not pour the yolks mixture into the whipped whites because doing so you compress the albumen and all the work is gone. 
3) Use a clean, dry bowl, free of yolk and any other oil or grease while beating egg whites.  
4) Beat the egg whites about 3-5 minutes at middle speed, until, firm and nearly stiff peaks. Beating egg whites is a very important process, It will help your cakes rise with perfectly.
5) Do not overbeat the egg whites,  it will cause cake shrinks after baking.
6) Do not over mix the cake batter, must be less than 25 times to prevert cake shrinks excessively around the edges.
7) Be careful not to over fold, because you will inevitably deflate the batter, causing it to not rise properly in the oven. Fold just until combined, then call it quits.
8) Store in covered containers in the fridge and consumed within 2 days.
9) Do not bake the cake quickly at a high temperature and don't remove hot cake out of a baking pan. otherwise the cake could fall apart and crack on top. Baking cake at a lower temperature will help the cake rise much higher and bake more evenly. 
10) You can test the cake by poking it with a skewer, if it's cooked the skewer will come out clean. if not pop it back in the oven and bake until it's ready. 
11) Cover with foil after a few minutes if the cake of top starts to get brown and continue rising nicely with a golden top.
12) For guaranteed results it's important to follow exactly this recipe and baking at the right temperature also recommended to use an oven thermometer. Please understand that everyone's oven work differently. You should also check the temperature of your oven. if not, your cake won't rise well. 
13) Cake sink or collapse after cooling, because you've turned the hot cake in the oven too soon once baked or pans were greased too heavily or placed too close together in the oven or over-baked.

Recipe Source: Josephine's Recipes