TOTAL PAGEVIEWS

Search This Blog

Translate

Friday 31 July 2020

Japanese Souffle Cheesecake | Super Fluffy & Jiggly


Make this to wow at any celebration. The best ever pillowy soft, light & heavenly cheesecake with chocolate swirl. It's a perfect summer dessert.

Ingredients

(A)
● 180g cream cheese
● 70g whole milk
● 3 small egg yolks
or 2 large egg yolks
● 55g plain flour
● 15g corn flour

(B)
● 4, small egg whites or
 3 large egg whites
● 70g sugar, optional

(C)
● 1 tsp dark cocoa powder
● cake batter, optional

You will need 6-inch oval or round baking pan. Line with the prepared round of parchment paper in the bottom.

Method:
1) In a saucepan, heat the cream cheese over low heat, add milk, stir until melted. Turn off the heat, add egg yolks one at a time and sieved flour. whisk the mixture not more than 10 times, because it's very important not to over mix at this point.

2) Whisk egg whites until foamy and add sugar a little bit at a time until stiff peaks, the peak stands straight up when the beaters are lifted from the mixture about 5 minutes.

3) Folding cake batter into a whites and mix until incorporated. Pour the batter into oval cake pan 21.5cm x 10cm, deep 6cm. Use 1 tsp dark cocoa powder, mix with the remaining batter. Place the bag inside a tall cup, spoon your chocolate batter inside the bag, snip off the corner. gently squeeze and use a chopstick or whatever tools can create any pattern you wanted on the top of cakes before you bake it to get a lovely effect.

4) Use a large baking pan for a cold water bath and bake in non-preheated rather than in preheated oven at 150°C for 45 minutes. Sit in the oven for 15 minutes, until it reach room temperature, typically 55°C.

5) Dropping the cake pan from high to prevent the cake to shrink too much during cooling. Make sure cakes are properly cooled before cutting them. Use a sharp and hot knife to cut the cake and present individual plated. Serve immediately or chill in a fridge overnight.

Helpful Tips:
1) Can you freeze the cream cheese? Not recommended. The texture will change considerably. It will be more crumbly and less creamy once thawed. it won't be as creamy as it used to be. When frozen, the cream cheese's liquids and solids will separate and this will alter the texture of the cream cheese. Still, frozen and thawed cream cheese is safe to use in cooking and baking.
2) I recommend one thing, do not pour the yolks mixture into the whipped whites because doing so you compress the albumen and all the work is gone. 
3) Use a clean, dry bowl, free of yolk and any other oil or grease while beating egg whites.  
4) Beat the egg whites about 3-5 minutes at middle speed, until, firm and nearly stiff peaks. Beating egg whites is a very important process, It will help your cakes rise with perfectly.
5) Do not overbeat the egg whites,  it will cause cake shrinks after baking.
6) Do not over mix the cake batter, must be less than 25 times to prevert cake shrinks excessively around the edges.
7) Be careful not to over fold, because you will inevitably deflate the batter, causing it to not rise properly in the oven. Fold just until combined, then call it quits.
8) Store in covered containers in the fridge and consumed within 2 days.
9) Do not bake the cake quickly at a high temperature and don't remove hot cake out of a baking pan. otherwise the cake could fall apart and crack on top. Baking cake at a lower temperature will help the cake rise much higher and bake more evenly. 
10) You can test the cake by poking it with a skewer, if it's cooked the skewer will come out clean. if not pop it back in the oven and bake until it's ready. 
11) Cover with foil after a few minutes if the cake of top starts to get brown and continue rising nicely with a golden top.
12) For guaranteed results it's important to follow exactly this recipe and baking at the right temperature also recommended to use an oven thermometer. Please understand that everyone's oven work differently. You should also check the temperature of your oven. if not, your cake won't rise well. 
13) Cake sink or collapse after cooling, because you've turned the hot cake in the oven too soon once baked or pans were greased too heavily or placed too close together in the oven or over-baked.

Recipe Source: Josephine's Recipes


Wednesday 29 July 2020

Zebra Butter Cake 斑马纹牛油蛋糕


1磅蛋糕模 1 lb loaf tin 22 x 11 x 6cm  

(A)
• 35g butter 牛油
• 35g milk 牛奶
• 10g granulated sugar 糖
• 2 egg yolks, cold 蛋黄 (冷)
• a pinch of sea salt 一小撮海盐
• 1/2 tsp honey or vanilla extract 蜂蜜或香草精
• 35g cake flour 低筋面粉

(B)
• 2 egg whites, cold 蛋白 (冷)
• 1/2 tsp distilled vinegar 醋
• 35g granulated sugar 糖

(C)
• 1 tbsp dark cocoa powder 可可粉
• 2 tbsp hot water 热水
or just adding 1 tbsp dark cocoa powder, as you prefer 或只需添加1汤匙可可粉,无需制作可可

Preheated oven to 100ºC-120ºC and steam bake with both top and bottom heat without fan assisted for 45 minutes, and increase to 130-150ºC for another 10 minutes. 热水浴,100°C-120ºC 预热烤箱 5分钟,上下火烤 45分钟。130C/150ºC  再烘烤10分钟。

Recipe Source: Josephine's Recipes

For more details please check out video down below.
详细做法请点击以下影片参考


Thursday 23 July 2020

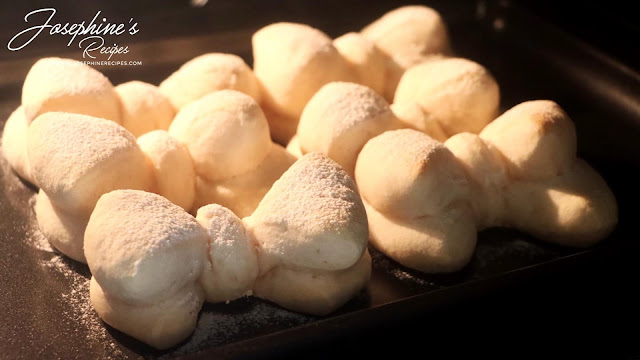
So Cute! Fluffy Bow Milk Bread 🎀 蝴蝶结牛奶面包


There's nothing better than the smell of freshly baked bread, don't you agree? to the appearance, to the taste, of course it's all so great! and because nothing beats homemade bread, here are the easy way to create your own bow shaped milk bread. For the first time it will take some effort to shape these, but after then you will get it done so quickly as possible. This recipe was a hit, and easy to follow! It can be using your hands and a mixer. Bread machine is a life saver for everyday bread, honestly! Just threw everything in the bread machine, press raw dough for mixing the dough and then press ferment until the beep noise. Take it out and shaped into as many as you want the bread rolls. this would save a lot of time and of course save life too.

Ingredients

(A)
165g bread flour
1 tsp, 4g allinson yeast
120g cold milk
20g sugar
2 tbsp milk powder, or just skip it

(B)
20g-30g butter or 2 tsp vegetable oil

(C)
Lightly sprinkle a little flour on top of the bread before baking to give a rustic look. A lot of flour will result in a softer crust.

For the glaze:
1 tsp honey or golden syrup and mix with a tsp of water

Method: 
1) Place the (A) ingredients, bread flour, yeast, cold milk, sugar and milk powder into the bread pan. close the lid gently.

2) Press the menu button until desired program ''raw dough'' is selected. so that the machine does all the mixing and kneading. Once the process has been completed ''stir 2'', open the lid, add butter to the bread pan, and continue until beeps will signal.

3) Press the menu button until you reach ''ferment''. The bread maker will allow your dough to rise for 30 minutes giving the dough more depth flavor or until beep to signal and then you take it out of the machine.

4) Turn the dough out onto a floured surface, punch down the dough, and cut into as many as you desire. roll each ball with a rolling pin. and roll up then place on the baking tray.

5) You don't need ''second rise'' for the no preheated oven. After shaped the dough, bake in no preheated oven 150°C, until the buns are golden brown, about 20 minutes. (Baking time depends on the size and shape of the bread being baked).

6) Once breads have cooked, remove from the oven and immediately brush with glaze.


Helpful Tips:
1) You still can use the same recipe and knead by hand or stand mixer instead.
2) These are best eaten within a day. Leftover breads can store in an airtight bag. It can also be frozen for up to 1 month, defrost and reheated in a toaster or hot oven. 
3) Yeast is best stored in the refrigerator, as the fungud in it will be killed at high temperatures. Before using yeast check the production date and storage life of your yeast. Refrigerate it as soon as possible after each use. The main cause of bread falling to rise is bad yeast.
4) The best way to store bread for freshness is in the freezer for about 1 month. after defrost the bread, reheating and serve, tastes like fresh-baked. 
5) It's recommended to use an oven thermometer.
6) If it's a winter day, the common problem is that dough won't rise. Using a warm oven by turn your oven on and off for a minute or with boiled water on the underneath to help your dough rise perfectly. 
7) Butter is better, because it's safe, fresh and real food. only little bit unhealthy saturated fats. Margarine is deadly, because of trans fats. You should probably just use 2 tsp or 1 tbsp rapeseed oil or mild olive oil instead to raise your good cholesterol and lower bad cholesterol, replace carbohydrates with fat.

Recipe Source: Josephine's Recipes


Sunday 19 July 2020

Easy No Knead Soft Cheese Bun / Dinner Rolls / Milk Bread


One of my original soft bread recipe was created a few years ago. The most rewarding experiences as a baker and foodie can have. It roughly 72% hydration, the dough is highly hydrated. you will love the bread texture and aroma of freshly baked bread wafting through at your home. It's easy to make bread that everyone can best enjoyed fresh from the oven.

(Whole dough 325g)
Makes 12 
34g each dough

Ingredients
(A)
• 120g cold milk
• 20g granulated sugar
• 1 tsp, 3-4g dried yeast
• 1/4 tsp salt
• 170g bread flour

(B)
a tsp vegetable oil for oiled the bowl and fermentation.

(C)
1 tsp honey or golden syrup
2 tsp warm water

Method: 
1) In a bowl, add the milk, sugar, dried yeast, salt and bread flour. use a spatula to stir until combined.

2) Greased the same bowl, cover with the lid, proof in the warm oven 30-35℃ for 30 minutes or cold fermentation overnight for the first proof.

3) Pushed all the air out and divide the dough into 12 pieces. shape into a round ball. sprinkle flour on top and then place them on a prepared tray and second rise again for another 30 minutes. 

4) Bake in preheated oven 150°C for 15 minutes. before 3 minutes baking, take it out brush honey or syrup water over the crust and sprinkle some grated mozzarella and cheddar cheese on top.

Helpful Tips:
1) Yeast is best stored in the refrigerator, as the fungud in it will be killed at high temperatures. Before using yeast check the production date and storage life of your yeast. Refrigerate it as soon as possible after each use. The main cause of bread falling to rise is bad yeast.
2) Store a bread in an airtight, re-sealed bag or airtight container and keep fresh for 2 days.
3) The best way to store bread for freshness is in the freezer for about 1 month. after defrost the bread, reheating and serve, tastes like fresh-baked.
4) you can make toast straight from the freezer. just pop your frozen slice of bread straight into the toaster, there's no need to defrost it first. It will only take slightly longer to cook than fresh bread.
5) If it's a winter day, the common problem is that dough won't rise. Ideal rise temperatures are between 35°C-37°C. Using a warm oven by turn your oven on and off or with boiled water on the underneath to help your dough rise perfectly.
6) It's recommended to use an oven thermometer.

Did you make this recipe?
Tag @josephinerecipes on Instagram and share your pictures on below comment box.

Recipe Source: Josephine's Recipes 
Tuesday 14 July 2020

Super Soft & Fluffy Zebra Cupcake


Don’t they look like real Zebra stripes? Zebra cake as pretty as it is delicious, not overly sweet, soft, light, fluffy and unique looking cupcakes.

Makes 12 cupcakes
Ingredients

(A)
• 2 tsp, 4g matcha green tea powder
• 2 tbsp, 20g hot water

(B)
• 4 egg yolks
• 70g milk
• 20g corn oil
• 45g plain flour, sieved
• 15g corn flour, sieved
• 1 tsp, 5g vanilla extract

(C)
• 4 egg whites
• 1/2 tsp white vinegar or lemon juice
• 60g sugar

Method:

1) In a small bowl, add matcha green tea powder and hot water, stir combine and set aside until ready to use,

2) In a bowl, mix (B) egg yolks, milk, corn oil, and vanilla extract. combine with plain flour and corn flour, stir until well combined.

3) In a separate bowl, whisk (C) egg whites until foamy then add a few drops of white vinegar and sugar a little bit at a time until, firm to stiff peaks, the peak stands straight up when the beaters are lifted from the mixture, about 5 minutes.

3) Using spatula to fold until incorporated. Pour half of the batter into a separate bowl, and add the matcha mixture, fold until well combined. Spoon the mixture into a piping bag, use scissor to cut a hole in the bottom of the bag.

4) Squeeze about 3 times of the plain batter into the centre of the cake pan, then another 3 times of the green batter on top and repeat until all batter has been used. Bang the cake pan onto the work surface to remove any air bubbles.

5) Bake in no preheated oven, no water bath, middle rack, up and bottom fan, (p) 120°C/ 100°C for 35 minutes. After baking, rest in the oven for 5 minutes. Baking time it will depend on the size of your cake pan. To make sure your cake to succeed even better. It is best to use an oven thermometer and you'll always have the exact temperature of your oven in mind.

Helpful Tips:
1)It's important to follow exactly this recipe and baking at the right temperature.
2) Do not bake the cake quickly at a high temperature and don't remove hot cake out of a baking pan. otherwise the cake could fall apart and crack on top. Baking cake at a lower temperature will help the cake rise much higher and bake more evenly.
3) Please understand that everyone's oven work differently. You should also check the temperature of your oven. if not, your cake won't rise well. 
4) You can test the cake by poking it with a skewer, if it's cooked the skewer will come out clean. if not pop it back in the oven and bake until it's ready. 
5) Folding is very important to created in the cake batter it rises as high as possible, don't use electric whisk to do this, and try not to be heavy-handed, otherwise you'll knock the air out. If you're too vigorous, you'll also make the texture of your cake tough, instead use a spatula in a gentle, slow and deliberate figure of eight motion, up and down finishing with scrape around the edge of the bowl. repeat this action, but don't be tempted to over-mix.
6) Use a clean, dry bowl, free of yolk and any other oil or grease while beating egg whites. Do not over or under-beat the egg whites.
7) Don't open the oven door until the cake is almost cooked.
8) Follow the exact weights given in this recipe and don't use cheap analogue scales that are hard to read. Use digital scales that weight in 1g increments are your best friend when baking.

Recipe Source: Josephine's Recipes

Saturday 11 July 2020

Super Soft and Moist Chocolate Swirl Cake Recipe


My go-to soft chocolate cake for my husband's birthday and I just want him to eat yummy and healthily most of the time, especially on his birthday. If you are looking for a fun and pretty way to decorate a cake! Follow this cake recipe and decorating tutorial for and easy drip cake with a swirl effect, and you’ll have a stunning cake at home and it's heavenly combination.

Ingredients
Makes 1 (PME round cake pan 6-inch)

(A)
• 35g salted butter, melted
• 35g whole or semi skimmed milk
• 10g golden granulated sugar

Egg Yolks:
• 2 large egg yolks, cold
• 1/2 tsp vanilla extract
• a pinch of sea salt
• 1 tbsp, 10g cocoa powder
• 2 tsp instant coffee
• 35g cake flour or 23g plain flour + 12g corn flour

(B)
Egg Whites:
• 2 large egg whites, cold
• 1/2 tsp distilled malt vinegar
• 35g golden granulated sugar, optional

(C)
Dark Chocolate Ganache:
• 55g, 5 tbsp dark chocolate chips
• 25g, 2 tbsp hot milk

(D) White Chocolate Ganache:
• 30g, 2 tbsp white chocolate chips
• 10g-12g, 1 tbsp hot milk

Above (C) dark and (D) white chocolate ganache, use a very hot milk to whisk with the chocolate chips until smooth and glossy. 

Method:
1) In a saucepan, add salted butter, milk, sugar, and bring to a simmer until the sugar dissolves.
Turn off the heat. whisk the egg yolks to break them up one by one. Add the sieved cake flour, use a whisker, continue to whisk until smooth and well combined.

2) In a separate bowl, start beating the whites at low speed until they are foamy, then add half tsp of white vinegar and add sugar a little bit at a time, move on to medium or even medium-high speed, do not beat on high, until nearly stiff peaks, about 5 minutes. Turn the whisker upside down and those peaks can hold proudly.

3) Fold about 1/4 of the egg whites into the yolk mixture, then repeat until the batter is evenly combined. Pour the batter into 6-inch pan, banging and tapping your pan a few times before popping a cake into the oven, to prevent release any large air bubbles, because you don't want too much air in the cake batter, it will create holes and cracks in the finished product.

4) Use a large baking pan for a hot water bath, steam bake in preheated oven to 100ºC, always use (oven thermometer) and bake with both top and bottom heat without fan assisted and bake for 65 minutes, and increase to 130-150ºC for another 10 minutes.

5) After it is baked, let it stand in the oven for 15 minutes, until the oven temperature reached 50ºC, which can avoid your cake to collapse. Dropping the cake pan from high to prevent the cake to shrink too much during cooling. Place treats on tray! It is best served chilled.

6) Once the cake is cool, remove the lining, then pour the warm chocolate ganache on to the centre of the cake and letting it run down the sides and pour the white chocolate ganache in the piping bag for drawing on the cake top and use a toothpick for a swirls. Transfer the cake to a plate for serving. Any leftover cake can be covered and kept in the fridge for 2 days.

Reminder: To make sure your cake to succeed even better. It is best to use an oven thermometer and you'll always have the exact temperature of your oven in mind.

Helpful Tips:
1) Do not over or under-beat the egg whites. 
2) Use a clean, dry bowl, free of yolk and any other oil or grease while beating egg whites.
3) Beating egg whites is a very important process, It will help your cakes rise with perfectly.
4) Folding egg whites into a cake batter. Do not stir and never use an electric mixer.
5) I recommend one thing, do not pour the yolks mixture into the whipped whites because doing so you compress the albumen and all the work is gone. 
6) For guaranteed results it's important to follow exactly this recipe and baking at the right temperature also recommended to use an oven thermometer.
7) Please understand that everyone's oven work differently. You should also check the temperature of your oven. if not, your cake won't rise well.
8) Do not bake the cake quickly at a high temperature and don't remove hot cake out of a baking pan. otherwise the cake could fall apart and crack on top. Baking cake at a lower temperature will help the cake rise much higher and bake more evenly.
9) You can test the cake by poking it with a skewer, if it's cooked the skewer will come out clean. if not pop it back in the oven and bake until it's ready.
10) Cover with foil after a few minutes if the cake of top starts to get brown and continue rising nicely with a golden top.
11) Store in covered containers in the fridge and consumed within 2 days.

Recipe Source: Josephine's Recipes


Friday 3 July 2020

How to make the world's softest butter sponge cake


️This is a great butter sponge cake to make as it really tasty, very soft and fluffy cake️, a sight to behold, with chocolate and butter sponge swirls creating a fun, simple and beautiful cake that delivers on flavour as well as appearance, the flavour and texture of this sponge is truly amazing and everyone will enjoy it.

Ingredients
Makes 1 (PME round cake pan 6-inch)

(A)
• 35g salted butter, melted
• 35g whole or semi skimmed milk
• 10g golden granulated sugar
• 2 large egg yolks, cold
• a pinch of sea salt
• 1/2 tsp vanilla extract
• 35g cake flour or 23g plain flour + 12g corn flour

(B)
• 2 large egg whites, cold
• 1/4 tsp cream of tartar or 1/2 tsp lime / lemon juice / distilled vinegar
• 35g golden granulated sugar, optional

(C)
• 1 tsp dark cocoa powder
• 3 tsp hot water

Method:
1) In a saucepan, add salted butter, milk, sugar, and bring to a simmer until the sugar dissolves. Turn off the heat. whisk the egg yolks to break them up one by one. Add the sieved cake flour, use a spatula press on it, and then use a strainer for an extra smooth.

2) In a separate bowl, start beating the whites at low speed until they are foamy, then add a tsp of cream of tartar or squeezing a little lime or lemon juice and add sugar a little bit at a time, move on to medium or even medium-high speed, do not beat on high, until nearly stiff peaks, about 3-5 minutes. Turn the whisker upside down and those peaks can hold proudly.

3) Fold about 1/4 of the egg whites into the yolk mixture, then repeat until the batter is evenly combined. Pour the batter into 6-inch pan and shake to release any large air bubbles.

4) In a small bowl, mix the cocoa powder and hot water together until smooth. allow to cool and then add a little cake mixture, mixing well until evenly blended.

5) Place the bag inside a tall cup, spoon your chocolate batter inside the bag, snip off the corner. gently squeeze and use a toothpick or whatever tools can create any pattern you wanted on the top of cakes before you bake it to get a lovely effect.

6) Use a large baking pan for a hot water bath, steam bake in preheated oven to 100ºC, always use (oven thermometer) and bake with both top and bottom heat without fan assisted and bake for 65 minutes, and increase to 130-150ºC for another 10 minutes.

Reminder: To make sure your cake to succeed even better. It is best to use an oven thermometer and you'll always have the exact temperature of your oven in mind.

7) After it s baked, let it stand in the oven for 15 minutes, until the oven temperature reached 50ºC, which can avoid your cake to collapse. Dropping the cake pan from high to prevent the cake to shrink too much during cooling. Place treats on tray! It is best served chilled.

Helpful Tips:
1) Store in covered containers in the fridge and consumed within 2 days.
2) Do not bake the cake quickly at a high temperature and don't remove hot cake out of a baking pan. otherwise the cake could fall apart and crack on top. Baking cake at a lower temperature will help the cake rise much higher and bake more evenly.
3) Please understand that everyone's oven work differently. You should also check the temperature of your oven. if not, your cake won't rise well.
4) You can test the cake by poking it with a skewer, if it's cooked the skewer will come out clean. if not pop it back in the oven and bake until it's ready.
5) Folding egg whites into a cake batter. Do not stir and never use an electric mixer.
6) Do not over or under-beat the egg whites. Use a clean, dry bowl, free of yolk and any other oil or grease while beating egg whites.
7) Beating egg whites is a very important process, It will help your cakes rise with perfectly.
8) Cover with foil after a few minutes if the cake of top starts to get brown and continue rising nicely with a golden top.
9) For guaranteed results it's important to follow exactly this recipe and baking at the right temperature also recommended to use an oven thermometer.

Recipe Source: Josephine's Recipes