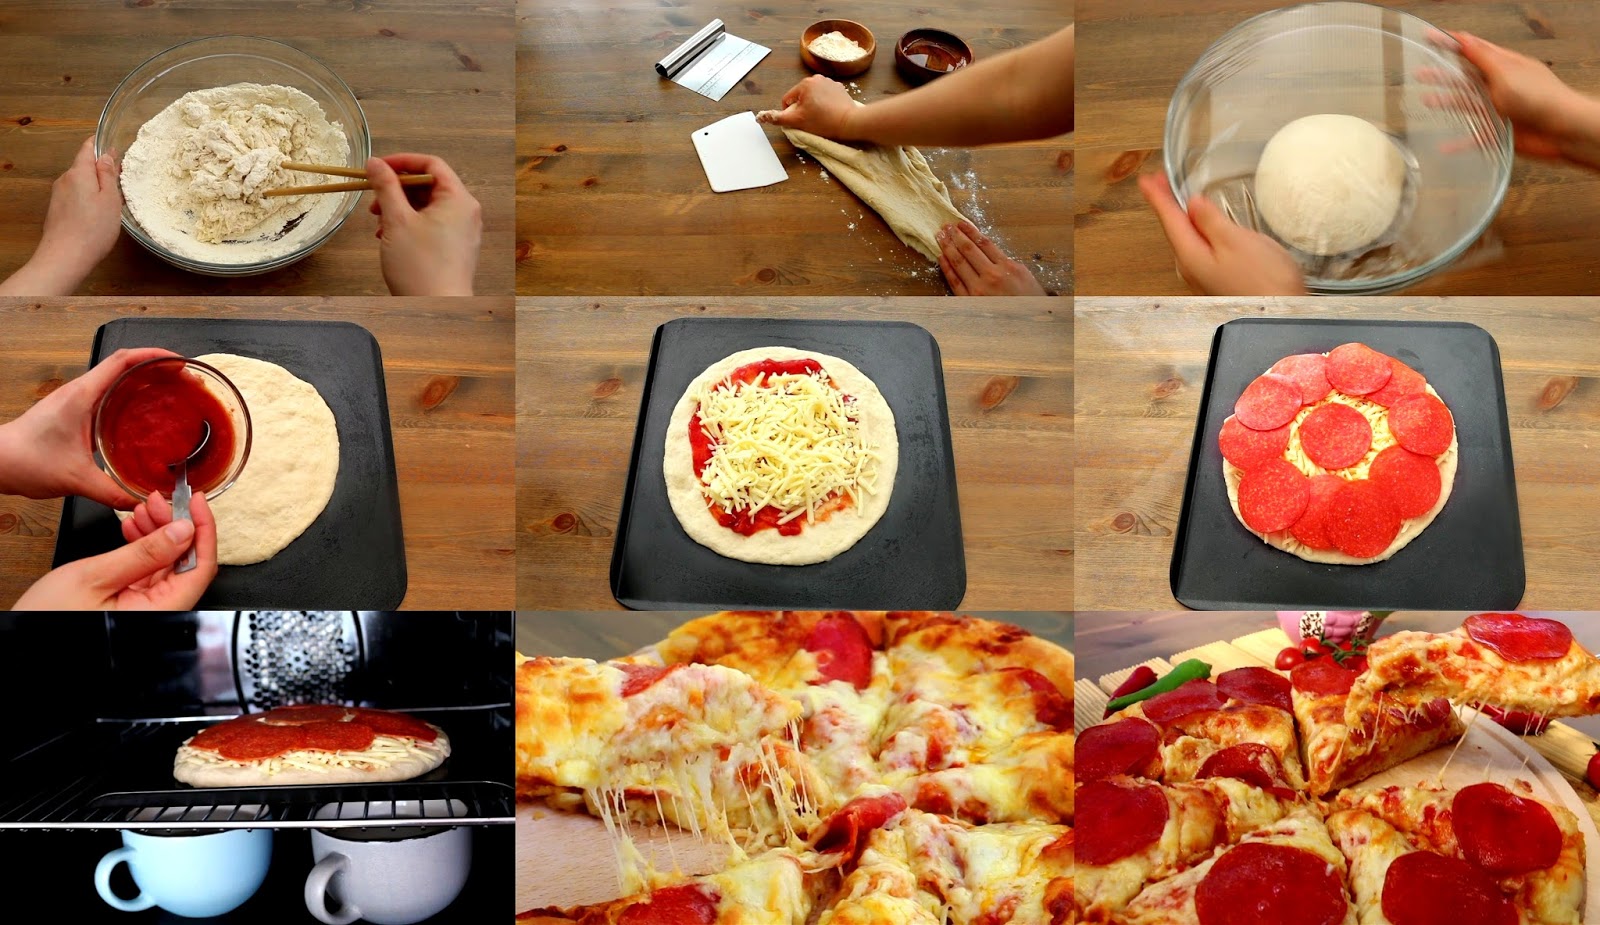
I absolutely adore this homemade pepperoni pizza, make it and that can be ready anytime you want to bake. These will warm you up and fill you, too! Makes 2 Ingredients For the base: (A) 2 1/2 cup bread flour 2 tbsps milk powder 3 tbsps sugar 1 1/2 tsp instant yeast 1 cup water (boiled and cooled) or cold milk (B) 1 tbsp olive oil For the pizza sauce: 2 tbsps tomato ketchup 3 tbsps tomato & basil pasta sauce (combine ketchup and pasta sauce ingredients in a small bowl) For the toppings: (D) 350g grated cheese & mozzarella mix 130g sliced spicy pepperoni Method: 1) In a bowl, Add (A) ingredients and mix together until well combined. Take the dough out and Sprinkle a work surface with flour, then tip the dough onto it. Add in olive oil and knead up to down and beating until the dough is no longer as sticky and go ahead and work the dough with your hands, forming it into a ball, and place in a clean bowl, cover with cling film, proof in the warm place for 2 hours until double or triple in sized. 2) Divide the soft dough into 2 portions and shape each to a ball. Sprinkle some flour on it, pressing down the dough with your hand under and arms, gently flattening along the edges with your fingertips and shape into large, flat rounds. 3) Spoon the pizza sauce evenly over crust. Topped with a pepperoni and sprinkle with cheese. 4) Cover with plastic wrap and cold proofing the dough in the top of the fridge for overnight ready to bake them in the next day. 5) The next morning, remove the dough from the fridge. 6) Let rise for 1 hour in the oven with 2 cups of hot/boiling water underneath and close the oven door. 7) Preheat the oven to 160°C, and Bake for 20 minutes, until crust is golden and cheese is melted. Cut into 8 slices. Serve immediately. Helpful Tips: 1) Everyone's oven is different, you have to adjusting the temperature and baking time. 2) You can bake it on the same day if you like crispy and chewy pizza, then just follow section 1, 2, 3, 6, 7. or keep it in the refrigerator for next morning ready to bake or even freeze them down for later use (up to two weeks). Freezing; leave to defrost and prove for 1 hour in the oven before baking. 3) Cold proofing dough make the bread more flavourful, light, soft and fluffy. Recipe Source: JosephineRecipes.Co.Uk
I absolutely adore this homemade pepperoni pizza, make it and that can be ready anytime you want to bake. These will warm you up and fill you, too! Makes 2 Ingredients For the base: (A) 2 1/2 cup bread flour 2 tbsps milk powder 3 tbsps sugar 1 1/2 tsp instant yeast 1 cup water (boiled and cooled) or cold milk (B) 1 tbsp olive oil For the pizza sauce: 2 tbsps tomato ketchup 3 tbsps tomato & basil pasta sauce (combine ketchup and pasta sauce ingredients in a small bowl) For the toppings: (D) 350g grated cheese & mozzarella mix 130g sliced spicy pepperoni Method: 1) In a bowl, Add (A) ingredients and mix together until well combined. Take the dough out and Sprinkle a work surface with flour, then tip the dough onto it. Add in olive oil and knead up to down and beating until the dough is no longer as sticky and go ahead and work the dough with your hands, forming it into a ball, and place in a clean bowl, cover with cling film, proof in the warm place for 2 hours until double or triple in sized. 2) Divide the soft dough into 2 portions and shape each to a ball. Sprinkle some flour on it, pressing down the dough with your hand under and arms, gently flattening along the edges with your fingertips and shape into large, flat rounds. 3) Spoon the pizza sauce evenly over crust. Topped with a pepperoni and sprinkle with cheese. 4) Cover with plastic wrap and cold proofing the dough in the top of the fridge for overnight ready to bake them in the next day. 5) The next morning, remove the dough from the fridge. 6) Let rise for 1 hour in the oven with 2 cups of hot/boiling water underneath and close the oven door. 7) Preheat the oven to 160°C, and Bake for 20 minutes, until crust is golden and cheese is melted. Cut into 8 slices. Serve immediately. Helpful Tips: 1) Everyone's oven is different, you have to adjusting the temperature and baking time. 2) You can bake it on the same day if you like crispy and chewy pizza, then just follow section 1, 2, 3, 6, 7. or keep it in the refrigerator for next morning ready to bake or even freeze them down for later use (up to two weeks). Freezing; leave to defrost and prove for 1 hour in the oven before baking. 3) Cold proofing dough make the bread more flavourful, light, soft and fluffy. Recipe Source: JosephineRecipes.Co.Uk
These incredibly light, soft and fluffy bread with garlic butter. It is just a bit enhanced to create an amazing tasting and melted cheese on top. My secret ingredients, methods and all the smartest tips for helping you make a no-fail breadsticks that is everything you ever dreamed it. Makes 2 Ingredients For the base: (A) ● 2 1/2 cup bread flour ● 2 tbsps milk powder ● 3 tbsps sugar ● 1 1/2 tsp instant yeast ● 1 cup water (boiled and cooled) or cold milk (B) ● 1 tbsp olive oil For the sauce: (C) ● 2 tbsps salted butter ● 2 cloves garlic, minced ● 2 tbsps mayonnaise For the toppings: (D) ● 350g grated cheese & mozzarella mix (E) ● Sprinkle with some sugar Method: 1) In a bowl, Add (A) ingredients and mix together until well combined. Take the dough out and Sprinkle a work surface with flour, then tip the dough onto it. Add in olive oil and knead up to down and beating until the dough is no longer as sticky and go ahead and work the dough with your hands, forming it into a ball, and place in a clean bowl, cover with cling film, proof in the warm place for 2 hours until double or triple in sized. 2) Divide the soft dough into 2 portions and shape each to a ball. Sprinkle some flour on it, pressing down the dough with your hand under and arms, gently flattening along the edges with your fingertips and shape into large, flat rounds. 3) Spoon garlic butter and mayonnaise over the bread. Topped with a grated mozzarella cheese. 4) Cover with plastic wrap and cold proofing the dough at the top of a refrigerator for overnight and ready to bake them the next day. 5) The next morning, remove the dough from the fridge. 6) Let rise for 35 minutes to 1 hour in the oven with 2 cups of hot/boiling water underneath and close the oven door. 7) Preheat the oven to 160°C, and Bake for 20 minutes, until crust is golden and cheese is melted. Cut into 16 breadsticks. Sprinkle with some sugar and Serve immediately. Helpful Tips: 1) Everyone's oven is different, you have to adjusting the temperature and baking time. 2) You can bake it on the same day if you like crispy and chewy pizza, then just follow section 1, 2, 3, 6, 7. or keep it in the refrigerator for next morning ready to bake or even freeze them down for later use (up to two weeks). Freezing; leave to defrost and prove for 1 hour in the oven before baking. 3) Cold proofing dough make the bread more flavourful, light, soft and fluffy. Recipe Source: JosephineRecipes.Co.Uk
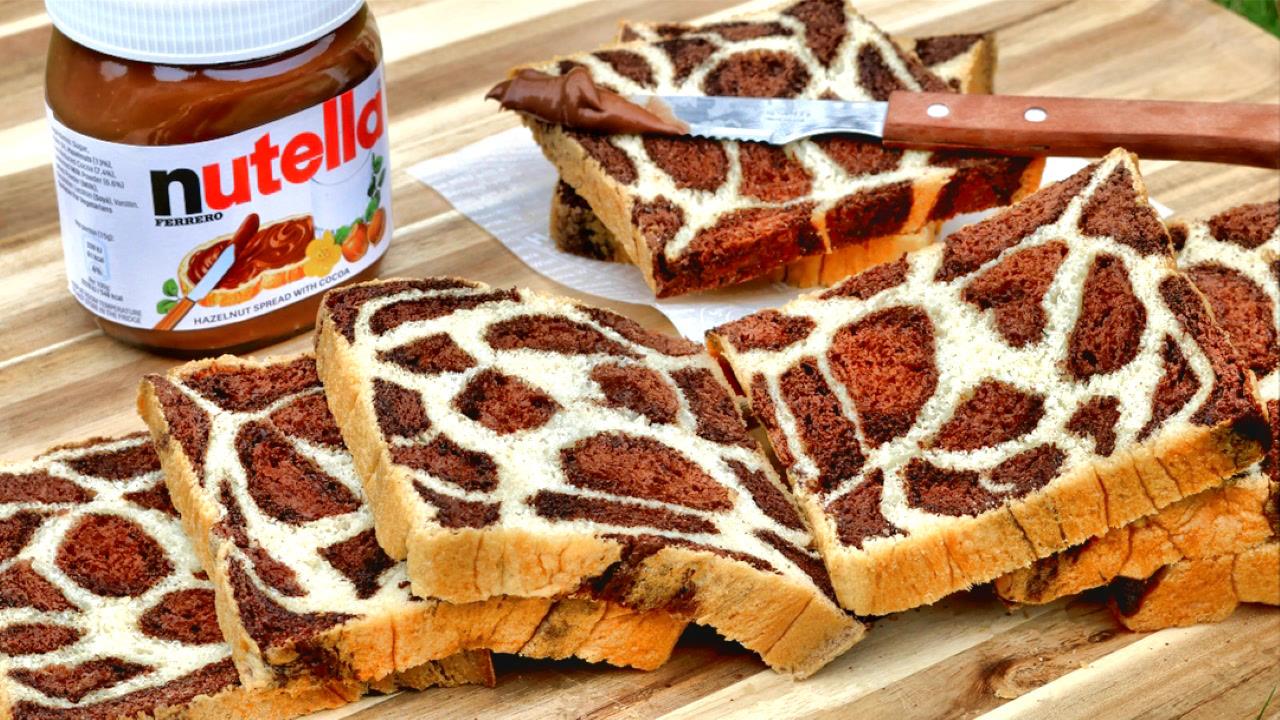
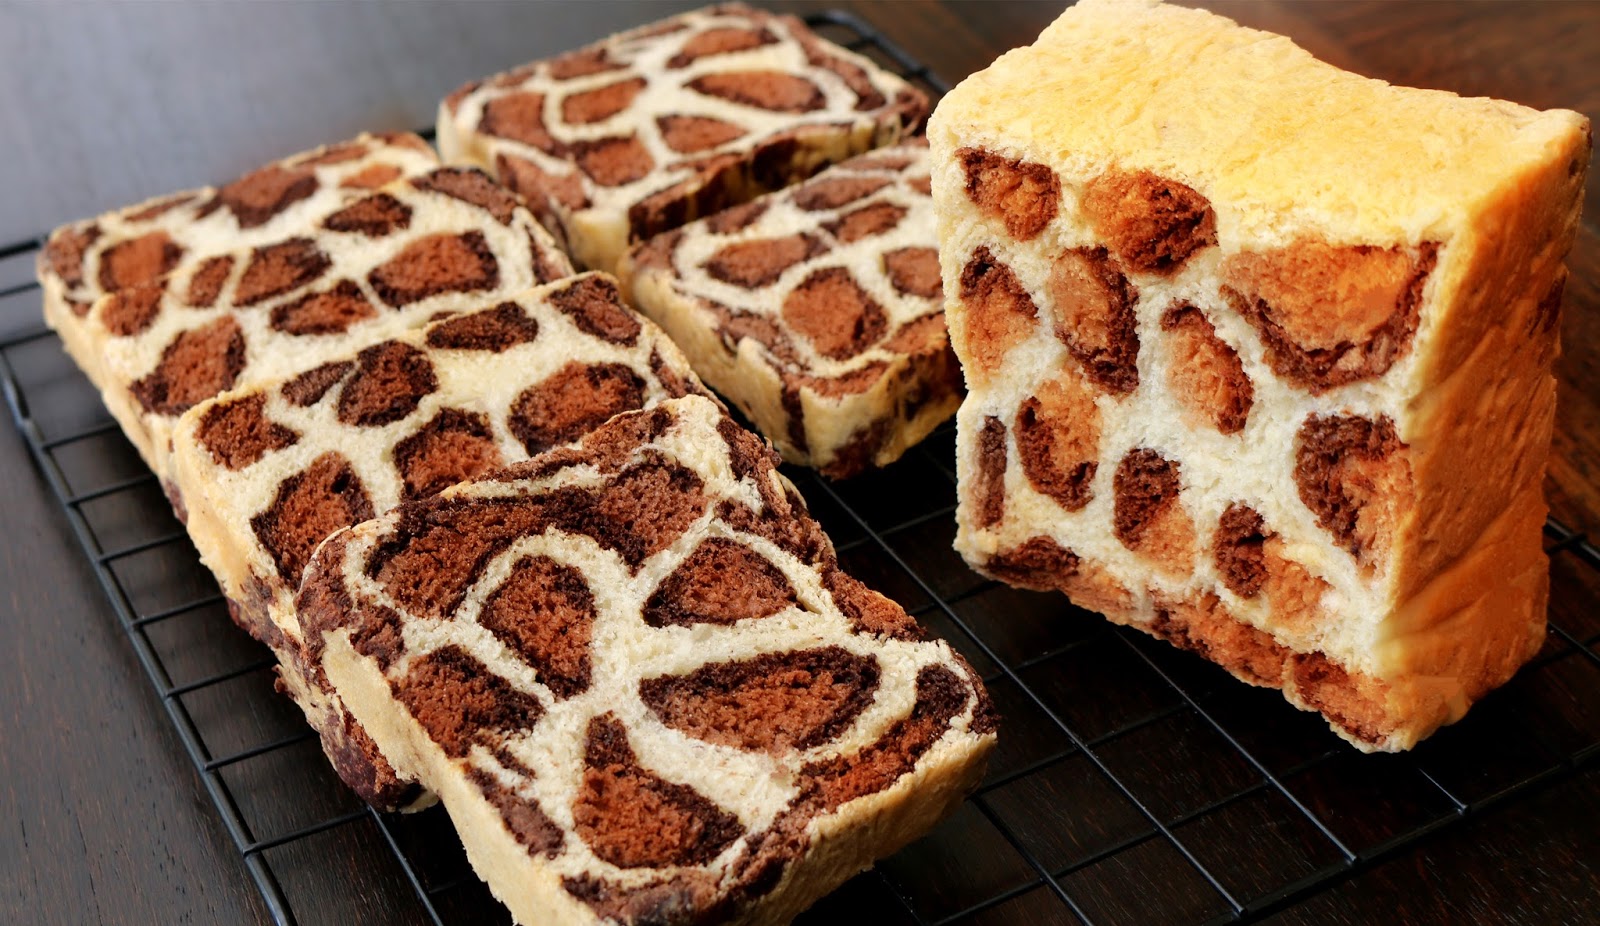
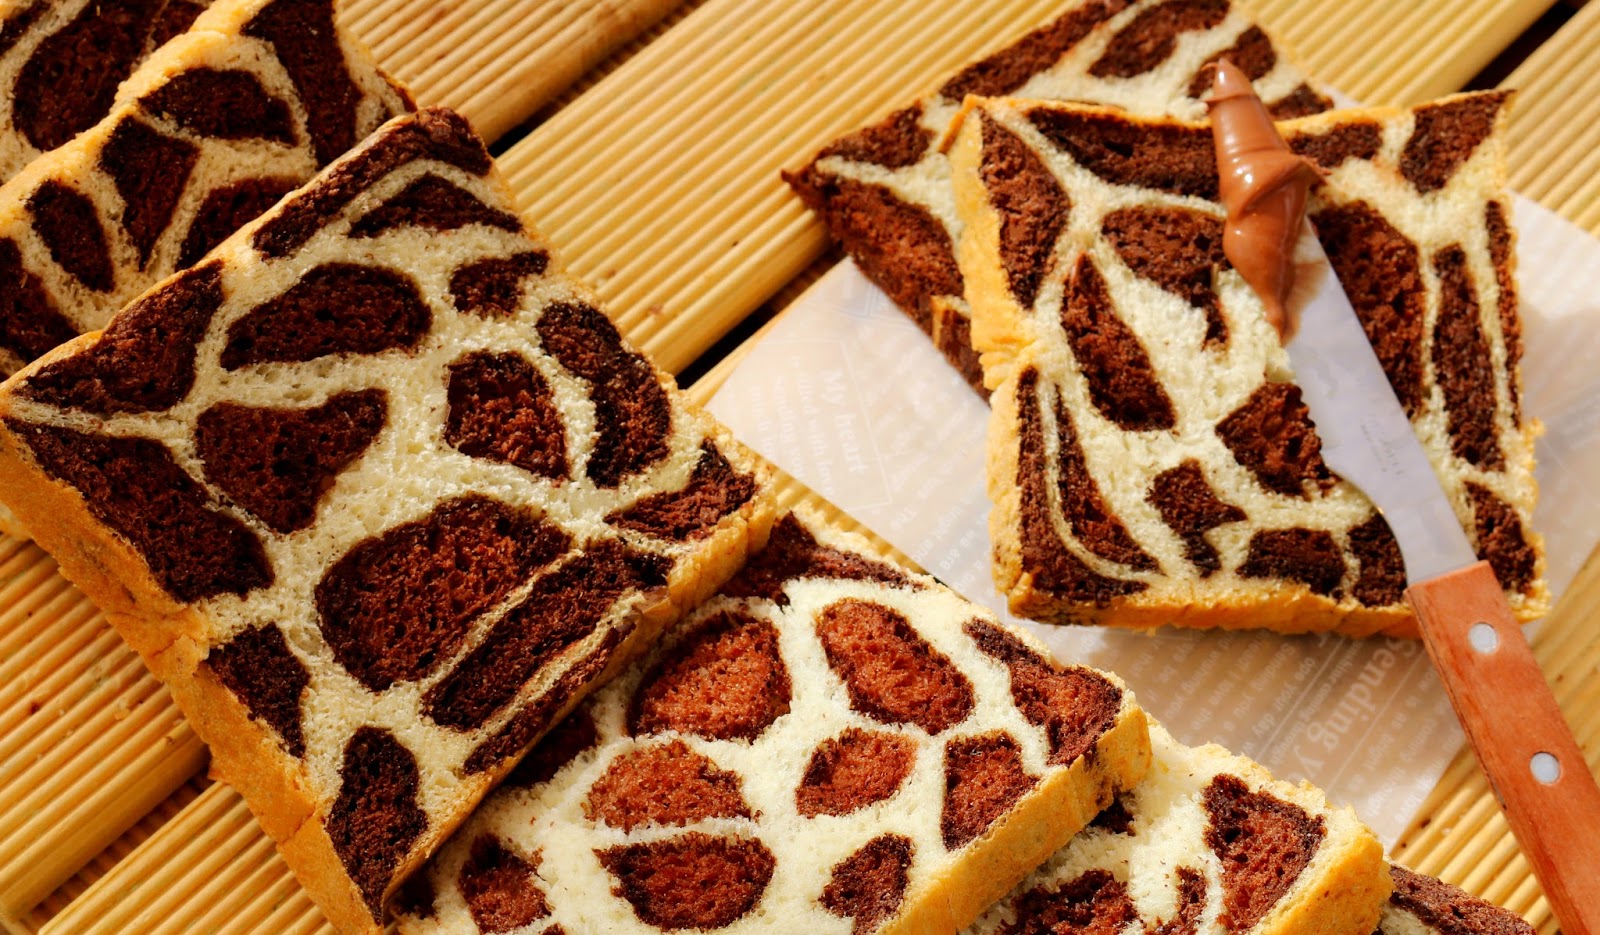
Why not bake your own Leopard print bread? You will have a very long relationship with ''bread''. Most probably when you are working very hard to make this beautiful loaf and invest in a new starter. For this lesson, I used my cold fermentation dough method and adjust to roll into 8 long log and cut half into 16. I suggest you use a stand mixer or bread machine if you have one. Because the kneading process will take longer than usual. Anyhow, you feel extremely tired. but you have been much happier with the final results. From starts, mixing, rising time usually takes longer. you can proofing the dough in the refrigerator at least 1 hour or overnight. Then take the dough out, kneading the dough until unstick, smooth and elastic. Separate the dough into 3. ''brown chocolate'', ''dark chocolate'' and ''plain'', then proofing in the warm place for 2 hours until double or triple in sized. Shaping and proofing again for 1 hour in the oven and finally baking. So now, Let get started.
(B)
● 25g salted butter
(melted or soften) Brown Chocolate Patches:
(C)
● 10g chocolate powder
● 6g cocoa powder
● 15g cold milk Dark Chocolate Patches:
(D)
●18g cocoa powder
● 2g instant coffee
● 15g cold milk Method:
1) In a bowl, Add (A) ingredients and mix together until well combined. Cold proofing the dough at least 1 hour or overnight in the refrigerator.
2) Take the dough out and Sprinkle a work surface with flour, then tip the dough onto it. Add in soften butter and knead up to down and beating until the dough is no longer as sticky and go ahead and work the dough with your hands, forming it into a ball, pressing it down and then divide in half, about 353g for plain dough and place in a clean bowl, cover with cling film, proof in the warm place for 2 hours.
Divide plain dough: 3 portions x 52g (large), 5 portions x 38g (Small). Adjust to score and shape to a round balls.
3) Remove 340g for brown and dark chocolate dough. I adjust 177g for brown chocolate dough, and 161g for dark chocolate dough. Now you have to add brown chocolate patches ingredients to a bowl, and add the mixture to the dough, knead by hand up to down, until the dough till colour is even. Once brown chocolate dough is done, place in another bowl and proof in the warm place for 2 hours. Divide brown chocolate dough, 3 portions x 29g (large), 5 portions x 18g (Small). Adjust to score and shape to a round balls.
6) Add the dark brown patches ingredients to a bowl, and add the mixture to the dough, knead by hand up to down until the dough till colour is even. Once dark brown dough is done, Place in another bowl and proof in the warm place for 2 hours. Divide the dark chocolate dough, 3 portions x 27g (large), 5 portions x 16g (Small). Adjusting the score and shape to a round balls.
7) Use a rolling pin, roll the brown chocolate dough into flat oval shape, then roll into a long log, and roll the dark chocolate dough and wrap in the brown, roll the plain and fully cover with the dough as the filling. Repeat the same for the rest.
8) Now, you have 8 long log, roll again until the length as double size as loaf pan. cut half into 16 long log. then place in the greased loaf pan, cover the lid and proof again in the warm place for 1 hour. (Suggested Rising Methods. Put the dough in the oven with 2 cups of hot/boiling water underneath and close the oven door). It's helps the dough almost at the top.
9) Preheat the oven to 170°C, and Bake for 40 minutes.
Everyone's oven is different, you have to adjusting the temperature and baking time. Cool in the tin for at least 25 minutes. Helpful Tips: 1) The weight of the dough in total, ''693g'. 2) Bread
dough will absorb or lose moisture at different conditions of
temperature and humidity. The weight of the
finished dough are not same as the first dough you make, but at least you have
693g. you know you can refrigerate or freeze a extra dough or just bake
it to serve as a buns. 3) All chocolate powders can vary in color from light reddish brown to a richer brown in difference between brands. You'll need to adjust a bit lighter than dark chocolate patches. 4) I suggest you use a stand mixer or bread machine if you have one. Because the kneading process will take longer to knead than usual. 5) You can use the same method by bread machine: In a bread pan, Add (A) ingredients, Press ''raw dough'' setting, and press start. Knead until well combined. add 25g soften butter, press again ''raw dough'' setting and continue knead until unstick, smooth and elastic. Take the dough out, separate the dough to 3 doughs, plain, brown and dark chocolate. Place the plain dough in a bowl and proofing in the warm place for 1 - 2 hours. Use the same bread pan, Add the brown chocolate patches, and the 177g dough and press ''leaven dough'' setting and press start, stir until well combined, take it out the dough and proofing in the warm place for 1 - 2 hours. Continue and repeat the process, add the dark chocolate patches, and add the 161g dough, press again ''leaven dough'' setting and press start knead until colour is even. Press ''ferment'' setting and rise in the machine until beep. Then follow the instructional video. Roll and shape, and proofing again in the warm place for 1 hour. Preheat the oven to 170c, bake for 40 minutes. Recipe Source: JosephineRecipes.Co.Uk
Why not bake your own Leopard print bread? You will have a very long relationship with ''bread''. Most probably when you are working very hard to make this beautiful loaf and invest in a new starter. For this lesson, I used my cold fermentation dough method and adjust to roll into 8 long log and cut half into 16. I suggest you use a stand mixer or bread machine if you have one. Because the kneading process will take longer than usual. Anyhow, you feel extremely tired. but you have been much happier with the final results. From starts, mixing, rising time usually takes longer. you can proofing the dough in the refrigerator at least 1 hour or overnight. Then take the dough out, kneading the dough until unstick, smooth and elastic. Separate the dough into 3. ''brown chocolate'', ''dark chocolate'' and ''plain'', then proofing in the warm place for 2 hours until double or triple in sized. Shaping and proofing again for 1 hour in the oven and finally baking. So now, Let get started.
Ingredients Dough:
(A)
● 21/2 cup bread flour
● 2 tbsps milk powder
● 3 tbsps sugar
● 11/2 tsp dried yeast
● 1 cup whole milk (cold or warm)
(B)
● 25g salted butter
(melted or soften) Brown Chocolate Patches:
(C)
● 1 tbsp chocolate powder
● 1 tbsps cocoa powder
● 2 tbsps whole milk Dark Chocolate Patches:
(D)
● 3 tbsps cocoa powder
● 1 tsp instant coffee
● 2 tbsps whole milk Method:
1) In a bowl, Add (A) ingredients and mix together until well combined. Cold proofing the dough at least 1 hour or overnight in the refrigerator.
2) Take the dough out and Sprinkle a work surface with flour, then tip the dough onto it. Add in soften butter and knead up to down and beating until the dough is no longer as sticky and go ahead and work the dough with your hands, forming it into a ball, pressing it down and then divide in half, about 353g for plain dough and place in a clean bowl, cover with cling film, proof in the warm place for 2 hours.
Divide plain dough: 3 portions x 52g (large), 5 portions x 38g (Small). Adjust to score and shape to a round balls.
3) Remove 340g for brown and dark chocolate dough. I adjust 177g for brown chocolate dough, and 161g for dark chocolate dough. Now you have to add brown chocolate patches ingredients to a bowl, and add the mixture to the dough, knead by hand up to down, until the dough till colour is even. Once brown chocolate dough is done, place in another bowl and proof in the warm place for 2 hours. Divide brown chocolate dough, 3 portions x 29g (large), 5 portions x 18g (Small). Adjust to score and shape to a round balls.
6) Add the dark brown patches ingredients to a bowl, and add the mixture to the dough, knead by hand up to down until the dough till colour is even. Once dark brown dough is done, Place in another bowl and proof in the warm place for 2 hours. Divide the dark chocolate dough, 3 portions x 27g (large), 5 portions x 16g (Small). Adjusting the score and shape to a round balls.
7) Use a rolling pin, roll the brown chocolate dough into flat oval shape, then roll into a long log, and roll the dark chocolate dough and wrap in the brown, roll the plain and fully cover with the dough as the filling. Repeat the same for the rest.
8) Now, you have 8 long log, roll again until the length as double size as loaf pan. cut half into 16 long log. then place in the greased loaf pan, cover the lid and proof again in the warm place for 1 hour. (Suggested Rising Methods. Put the dough in the oven with 2 cups of hot/boiling water underneath and close the oven door). It's helps the dough almost at the top.
9) Preheat the oven to 170°C, and Bake for 40 minutes.
Everyone's oven is different, you have to adjusting the temperature and baking time. Cool in the tin for at least 25 minutes. Helpful Tips: 1) The weight of the dough in total, ''693g'. 2) Bread
dough will absorb or lose moisture at different conditions of
temperature and humidity. The weight of the
finished dough are not same as the first dough you make, but at least you have
693g. you know you can refrigerate or freeze a extra dough or just bake
it to serve as a buns. 3) All chocolate powders can vary in color from light reddish brown to a richer brown in difference between brands. You'll need to adjust a bit lighter than dark chocolate patches. 4)
I suggest you use a stand mixer or bread machine if you have one.
Because the kneading process will take longer to knead than usual. 5) You can use the same method by bread machine: In
a bread pan, Add (A) ingredients, Press ''raw dough'' setting, and
press start. Knead until well combined. add 25g soften butter, press
again ''raw dough'' setting and continue knead until unstick, smooth and
elastic. Take the dough out, separate the dough to 3 doughs, plain,
brown and dark chocolate. Place the plain dough in a bowl and proofing
in the warm place for 1 - 2 hours. Use the same bread pan, Add the brown
chocolate patches, and the 177g dough and press ''leaven dough''
setting and press start, stir until well combined, take it out the dough
and proofing in the warm place for 1 - 2 hours. Continue and repeat the
process, add the dark chocolate patches, and add the 161g dough, press
again ''leaven dough'' setting and press start knead until colour is
even. Press ''ferment'' setting and rise in the machine until beep.
Then follow the instructional video. Roll and shape, and proofing again
in the warm place for 1 hour. Preheat the oven to 170c, bake for 40
minutes.
Why not bake your own Leopard print bread? You will have a very long relationship with ''bread''. Most probably when you are working very hard to make this beautiful loaf and invest in a new starter. For this lesson, I used my cold fermentation dough method and adjust to roll into 8 long log and cut half into 16. I suggest you use a stand mixer or bread machine if you have one. Because the kneading process will take longer than usual. Anyhow, you feel extremely tired. but you have been much happier with the final results. From starts, mixing, rising time usually takes longer. you can proofing the dough in the refrigerator at least 1 hour or overnight. Then take the dough out, kneading the dough until unstick, smooth and elastic. Separate the dough into 3. ''brown chocolate'', ''dark chocolate'' and ''plain'', then proofing in the warm place for 2 hours until double or triple in sized. Shaping and proofing again for 1 hour in the oven and finally baking. So now, Let get started.
Ingredients Dough:
(A)
● 21/2 cup bread flour
● 2 tbsps milk powder
● 3 tbsps sugar
● 11/2 tsp dried yeast
● 1 cup whole milk (cold or warm)
(B)
● 25g salted butter
(melted or soften) Brown Chocolate Patches:
(C)
● 1 tbsp chocolate powder
● 1 tbsps cocoa powder
● 2 tbsps whole milk Dark Chocolate Patches:
(D)
● 3 tbsps cocoa powder
● 1 tsp instant coffee
● 2 tbsps whole milk Method:
1) In a bowl, Add (A) ingredients and mix together until well combined. Cold proofing the dough at least 1 hour or overnight in the refrigerator.
2) Take the dough out and Sprinkle a work surface with flour, then tip the dough onto it. Add in soften butter and knead up to down and beating until the dough is no longer as sticky and go ahead and work the dough with your hands, forming it into a ball, pressing it down and then divide in half, about 353g for plain dough and place in a clean bowl, cover with cling film, proof in the warm place for 2 hours.
Divide plain dough: 3 portions x 52g (large), 5 portions x 38g (Small). Adjust to score and shape to a round balls.
3) Remove 340g for brown and dark chocolate dough. I adjust 177g for brown chocolate dough, and 161g for dark chocolate dough. Now you have to add brown chocolate patches ingredients to a bowl, and add the mixture to the dough, knead by hand up to down, until the dough till colour is even. Once brown chocolate dough is done, place in another bowl and proof in the warm place for 2 hours. Divide brown chocolate dough, 3 portions x 29g (large), 5 portions x 18g (Small). Adjust to score and shape to a round balls.
6) Add the dark brown patches ingredients to a bowl, and add the mixture to the dough, knead by hand up to down until the dough till colour is even. Once dark brown dough is done, Place in another bowl and proof in the warm place for 2 hours. Divide the dark chocolate dough, 3 portions x 27g (large), 5 portions x 16g (Small). Adjusting the score and shape to a round balls.
7) Use a rolling pin, roll the brown chocolate dough into flat oval shape, then roll into a long log, and roll the dark chocolate dough and wrap in the brown, roll the plain and fully cover with the dough as the filling. Repeat the same for the rest.
8) Now, you have 8 long log, roll again until the length as double size as loaf pan. cut half into 16 long log. then place in the greased loaf pan, cover the lid and proof again in the warm place for 1 hour. (Suggested Rising Methods. Put the dough in the oven with 2 cups of hot/boiling water underneath and close the oven door). It's helps the dough almost at the top.
9) Preheat the oven to 170°C, and Bake for 40 minutes.
Everyone's oven is different, you have to adjusting the temperature and baking time. Cool in the tin for at least 25 minutes.
Helpful Tips: 1) The weight of the dough in total, ''693g'. 2) Bread
dough will absorb or lose moisture at different conditions of
temperature and humidity. The weight of the
finished dough are not same as the first dough you make, but at least you have
693g. you know you can refrigerate or freeze a extra dough or just bake
it to serve as a buns. 3) All chocolate powders can vary in color from light reddish brown to a richer brown in difference between brands. You'll need to adjust a bit lighter than dark chocolate patches. 4)
I suggest you use a stand mixer or bread machine if you have one.
Because the kneading process will take longer to knead than usual. 5) You can use the same method by bread machine: In
a bread pan, Add (A) ingredients, Press ''raw dough'' setting, and
press start. Knead until well combined. add 25g soften butter, press
again ''raw dough'' setting and continue knead until unstick, smooth and
elastic. Take the dough out, separate the dough to 3 doughs, plain,
brown and dark chocolate. Place the plain dough in a bowl and proofing
in the warm place for 1 - 2 hours. Use the same bread pan, Add the brown
chocolate patches, and the 177g dough and press ''leaven dough''
setting and press start, stir until well combined, take it out the dough
and proofing in the warm place for 1 - 2 hours. Continue and repeat the
process, add the dark chocolate patches, and add the 161g dough, press
again ''leaven dough'' setting and press start knead until colour is
even. Press ''ferment'' setting and rise in the machine until beep.
Then follow the instructional video. Roll and shape, and proofing again
in the warm place for 1 hour. Preheat the oven to 170c, bake for 40
minutes. Recipe Source: JosephineRecipes.Co.Uk